SPMT hydraulic platform trailer positioning accuracy verification experiment
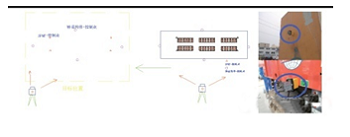
1. The experimental site, measurement equipment and experimental design description are shown in Figure 6. This verification experiment is carried out on a flat concrete site using a 6-axis SPMT. The experimental process is carried out by professional SPMT operators according to the experimental process. The experimental measurement tool uses the total station accuracy measurement and control system and the Digital Dock automatic detection software system. The total station angle measurement accuracy is 0.5 s, and the ranging accuracy is 0.5 mm+1 mm/ppm. The computing system has the ability to synchronously link multiple devices for synchronous measurement and tracking. As shown in Fig. 7, after the SPMT loads the components, the initial ground reference point is laid out, and the position coordinates of the target (component) measurement point are inversely calculated through the reference point coordinates. Then make the SPMT drive away from the reference position as a whole and then return to the original reference position along the established trajectory. After the positioning, the positioning coordinates of the measuring points on the left and right sides of the component are measured respectively, and the position coordinates of the initial measuring points are compared and analyzed to obtain the SPMT positioning accuracy. Figure 6 Experimental site and total station measurement and control equipment 
Fig.7 Schematic diagram of SPMT positioning accuracy experimental design and measurement point diagram

2. Description of the experimental process
Step 1: Apply the total station and the corresponding tooling, set the original reference point on the ground, and use its position coordinates to inversely calculate the position coordinates of the target (component), and quickly set out the target position coordinates with high precision (accuracy better than 1mm), and paste them at the same time. Measure marker points.
Step 2: SPMT starts to simulate the installation scene after driving away from the original reference point in normal driving mode, returns to the original reference point in normal driving mode, and prepares to track the running trajectory when it approaches the reference point about 20 m.
Step 3: Borrow the 360° tracking prism to track the traveling trajectory when traveling 20~10 m away from the original reference point. During the movement of the component, 4 automatic version total stations track the prism in real time for data feedback, and correct the operation in real time according to the feedback data. trajectories, as shown in Table 1.
Step 4: After completing the trajectory correction, run in micro-travel mode. When the operation enters the predetermined target area within 30 mm, quick operation and adjustment are performed through the visual point position. The visual point position is intuitive and convenient, and SPMT operators can make quick and intuitive adjustments.
Step 5: The total station is used for high-precision detection, and the attitude information is fed back. The SPMT adjusts according to the feedback information to confirm the final accurate landing state that the SPMT can achieve. After landing, read the position data of the detection point, and carry out the feedback analysis of the experimental results, as shown in Table 2.
3. Analysis of experimental results
Through the above experimental analysis, it can be seen that the SPMT normal driving (non-micro-travel mode) can correct the driving straightness within 10 m, and the accuracy level of SPMT precise positioning (micro-travel mode) can reach within 2 mm.
Conclusion
Through the functional analysis of SPMT's support, steering and drive systems, it is demonstrated that SPMT can be used for the installation and positioning of large-scale and large-mass modular components. In order to determine its positioning accuracy, the positioning accuracy experiment and actual project operation are carried out through the total station measurement system, and it is verified that the positioning accuracy can reach within 2 mm. The content and results have important guiding significance for the modular installation of large pieces.


